
Make a Teepee
While considering strong building shapes and what building materials are best for a given structure, participants create poles and a teepee cover to make a teepee that’s big enough to get inside.

Overview
STEM careers
Grade level
Time
Materials
Per Team:
- Newspaper (at least 90 sheets)
- 9″ thin paper plates (at least 75)
- Rubber bands (box of 300–1,000)
- Tape
- Stapler
Relevant Terminology
Cone: A three-dimensional shape with a flat, circular base that tapers to a point at the top, like a birthday hat.
Teepee (or tipi): A cone-shaped tent associated with Native American tribes living in the Great Plains and Canadian prairies.
Introduce
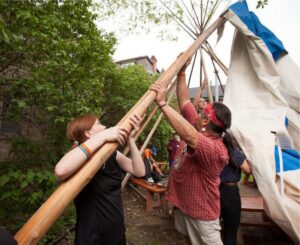
Seventh and eighth grade students work together to cover a teepee at the Four Directions Aboriginal Student Centre at Queen’s University in Kingston, Ontario, Canada. Credit: Queen’s University.
GETTING READY
Clear a large space (approximately 6′ diameter) for building each teepee. Make the supplies easily accessible and provide table space for rolling the newspaper.
INTRODUCTION
Have you ever seen a teepee? Teepees are cone-shaped tents that were used for shelter by Native Americans in the Great Plains of North America. Teepees were warm in the winter and cool in the summer, and they were easily moved from place to place. Today you will help build a teepee by following a simple, repeating pattern.
Instructions
Introduce the design challenge. Build a teepee large enough to sit in using newspaper and paper plates.
Depending upon group size, conduct the activity as one big team or organize participants into smaller teams. Provide instructions to the participants:
Build at least five teepee poles, each of which consists of three segments.
- Diagonally roll six sheets of newspaper to make a tight tube. Secure the end with tape. This is one pole segment.
- Roll two more pole segments. Join the segments by inserting the end of one segment into another and securing them with tape. This is one teepee pole.
- Join the tops of five teepee poles with rubber bands. Stand the poles up and spread them apart to form the conical teepee shape.
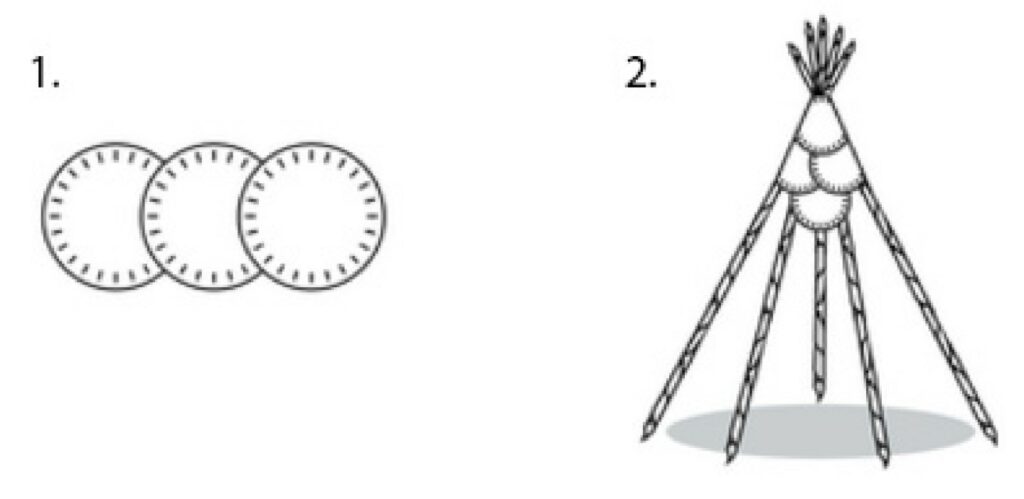
Staple three plates (1) to make a ring at the top of the teepee poles (2). Credit: PBS Kids/CYBERCHASE.
Make a covering for the teepee out of paper plates.
- Staple three or four plates together side by side. Wrap these around the top of the teepee and staple them together to make a ring.
- Slide a plate under the ring and staple it in place. Continue placing plates around the teepee, allowing higher layers to overlap lower layers.
- Leave an opening large enough for participants to enter the teepee.
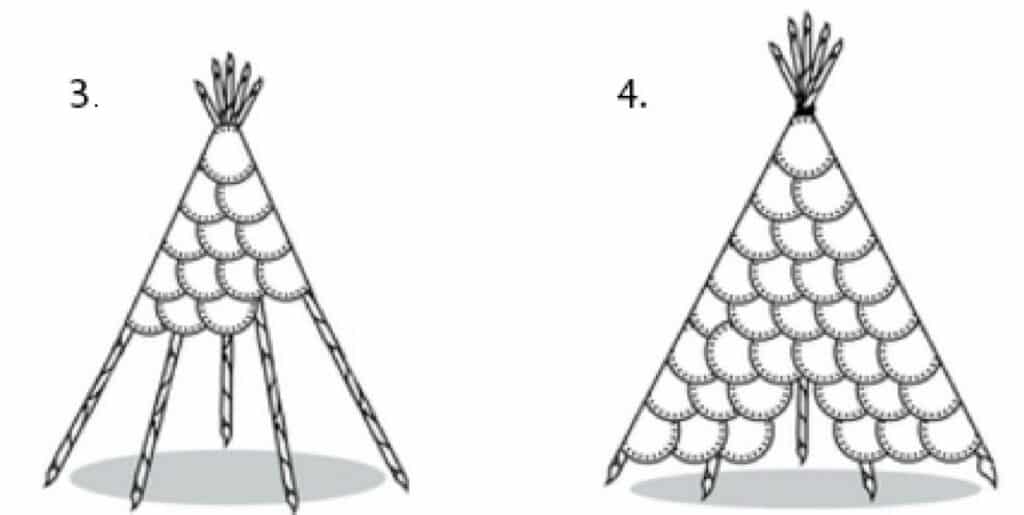
Add plates below the ring, allowing higher plates to overlap lower plates (3). Remember to leave an opening (4). Credit: PBS Kids/ CYBERCHASE.
ACTIVITY VARIATIONS
Use the newspaper sections to make triangles and build a geodesic dome.
Guiding questions
GUIDANCE FOR YOUNGER CHILDREN
QUESTIONS TO ASK AFTER THE ACTIVITY
- If you made your teepee bigger, do you think it would be stronger or weaker than a smaller teepee? Why do you think so?
- Would your teepee weaken if you added windows? What about adding a tunnel to another teepee?
- If you wanted a bigger teepee with windows and maybe a tunnel to another teepee, what could you do to make the teepee really strong?
- What building materials would you use if you had to sleep in your teepee outside, where it might rain or snow or be windy?
- How would you make it possible to have a fire inside your teepee, so that the teepee didn’t catch fire and all the smoke didn’t stay inside?
GUIDANCE FOR OLDER YOUTH AND ADULTS
QUESTIONS TO ASK AFTER THE ACTIVITY
- How would you design a teepee for a very cold climate?
- What modern materials would you use to design a truly livable teepee?
- What were the biggest challenges in creating the tent poles for your teepee? How did you connect multiple pieces of newspaper together to create a strong joint?
Engineering & science connections
GUIDANCE FOR YOUNGER CHILDREN
Engineering Connections
Engineering is about providing answers to a need. Native Americans needed a portable home that could stand up to the high winds on the plains. Over time they perfected a way of using the toothpick-straight lodgepole pine to provide poles, buffalo skins for a cover, ropes, and smaller sticks to build a sturdy home that could be easily moved and put up in under an hour. Engineering is also about changing designs when new materials are available. Teepees were originally only about 8’–14′ in diameter, as the poles needed to be light enough to be pulled from place to place easily. Once horses were introduced, teepee poles could be longer, up to 22′, and eventually canvas covers replaced buffalo skins.
Science Connections
Teepees start with triangles—one of the strongest shapes used by engineers. Three long poles are tied together at one end by rope, then raised and positioned to form a tripod. If you were to place a cover over it at this time, it would look like another ancient structure: a pyramid. But the flat sides would catch the wind and pull the teepee down. Instead, additional sticks are positioned so that the ends touching the ground make a circle while the other ends are lashed together near the top. When the cover is placed over the sticks, it makes a cone shape. Winds slide over the curved surface of the teepee, just as they slide over the curves of the Shanghai Tower.
GUIDANCE FOR OLDER YOUTH AND ADULTS
Engineering Connections
Structural engineers take many different factors into account in order to build a structure that will stand the test of time. Some of those factors include climate, the type of land where they will be building, and the materials that are available in that region. Any available materials could be used, but the best ones will take other factors into account. In the case of Native Americans, they had to create a shelter that could not only protect them from sun, rain, and snow, but also be quickly disassembled and carried to their next camp. Shelters used by modern-day backpackers and hikers have similar requirements. Engineers have designed so-called four season tents for use in extreme weather conditions. These tents, carried by hikers climbing Mt. Everest, keep the occupants warm in temperatures as low as -100° Fahrenheit but only weigh around 3 pounds.
Science Connections
For heating and cooling their interior, teepees make use of the scientific principle that hot air rises. Flaps attached to poles can be used to open or close a vent hole near the top. The flaps can be closed in rainy or severe weather. In winter, Native Americans would start a fire in the center of the teepee to provide warmth. The air around the fire would warm up and begin rising to the top of the teepee. Since hot air rises (due to expansion and a corresponding reduction in density), any hot smoke would rise upward and escape to the outside, allowing the occupants to stay warm and to still breathe clean air inside the teepee. During the summer months, the hole at the top would actually keep the teepee cool inside. As the sun beat down on the teepee, the warm air would rise toward the hole at the top of the structure and be replaced by cooler air entering through an open flap at the door. This one hole in the top of the teepee, when paired with the knowledge that hot air rises, enabled Native Americans to control the temperature inside of their dwellings to keep themselves comfortable.
Activity adapted from PBS Kids/CYBERCHASE. All rights reserved.
pbskids.org/cyberchase/activities/make-tikiville-teepee/
Supplemental content adapted for Dream Big Activities by Carnegie Science Center.
0 Comments