
Make Your Own Glue
Participants learn about adhesives–how they work and how engineers test them–as they create their own glue and test it against other glue types.

Overview
STEM careers
Time
Materials
Per Team:
|
For each glue-testing station:
|
Relevant Terminology
Adhesion: What it’s called when one substance sticks to a different substance.
Cohesion: What it’s called when a substance sticks to itself.
Glue: A sticky substance used for holding objects together.
Peeling strength: The resistance to peeling that something like tape has from a surface. A test of peeling strength is done with adhesive applied to another surface, with the “peel” done at a 90° angle.
Tensile strength: The strength a material has to resist being pulled apart. If you glue something to the ceiling, the weight of the object tests the glue’s tensile strength.
Shear strength: The resistance to being slid from side to side. This tests the strength of the adhesive or glue when it is used to attach parallel surfaces, and then force is applied until the surfaces slide apart.
Introduce
INTRODUCTION
Research into the Great Wall of China shows that ancient engineers decided to add sticky rice to the mortar mixture, a type of sticky paste used to hold the bricks of the Great Wall together. Why did they do this? Did they know that it would make it stronger, or did they make a guess? No one knows for certain, but what we know now, 1,500 years later, is that it did make those sections of the wall stronger. Modern engineers figured this out by testing the strength of the material. Today, engineers are still testing sticky substances to determine the best or strongest material that should be used in a building. Mortar is technically different from glue, but both substances have adhesive properties: they are used to hold objects together to resist separation. For this activity, we will be concentrating on glue.
Different types of glue have different degrees of stickiness. Some glues can hold a very heavy object onto a wall, while other glues hardly stick at all. To determine just how sticky a glue is, scientists and engineers have come up with tests to rate a glue’s stickiness.
Modern engineers need to know exactly how much weight different types of adhesive substances will support. They’ve developed ways of testing this very precisely so that they know how each will respond in a variety of ways. These tests include the tensile, peel, and shear tests.
The strength of a glue as it holds a weight that is pulling down on it is called tensile strength. We will make glue and we will also test the tensile strength of different glues.
GETTING READY
Depending on group size, you can either let each team have access to a set of materials, or you can have a single station for measuring out liquid ingredients and picking up other supplies.
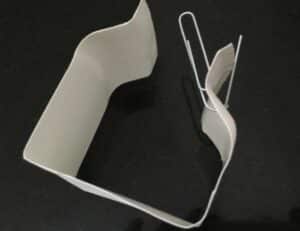
Test strips (3–4 per team):
- Cut paper plates into 2-inch wide strips. Punch a hole at each end of the strip and fold it in thirds.
- Pull apart one end of a large paperclip so that it looks like a hook. Repeat with a second paper clip. Attach each paper clip to the holes at the end of the strip.
Weight holder (1 per team):
- Punch two holes on either side of a paper cup. Make a hook out of two more paper clips as before. Tie each end of one piece of 30″ string to each of the tops of the paper clips in the cup. The string makes a handle for the cup.
Instructions
 Divide participants into teams and give them the following instructions.
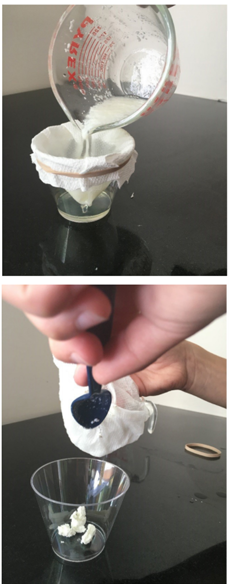
Add 1/4 cup skim milk to the measuring cup. Add 1 tablespoon vinegar. Caution: For safety, be sure to inform participants not to taste or eat any of the materials during this activity.
Stir the mixture together until it stops changing. This should take about a minute.
Strain the solids using a coffee filter. Put a rubber band around the top of the cup to hold the filter in place. Make certain that the bottom of the filter remains above the level of the strained liquid.
Slowly pour the milk/vinegar mixture through the paper towel or coffee filter into the cup.
Lift the filter paper and gently squeeze any remaining liquid into the cup.
Save the paper filter with the solids. Dispose of the liquid from the cup and dry the cup. Gently scrape the white clumps from the paper filter into the cup.
Add a pinch of baking soda, which will help firm up the glue.
Stir the mixture to make a paste.
Testing
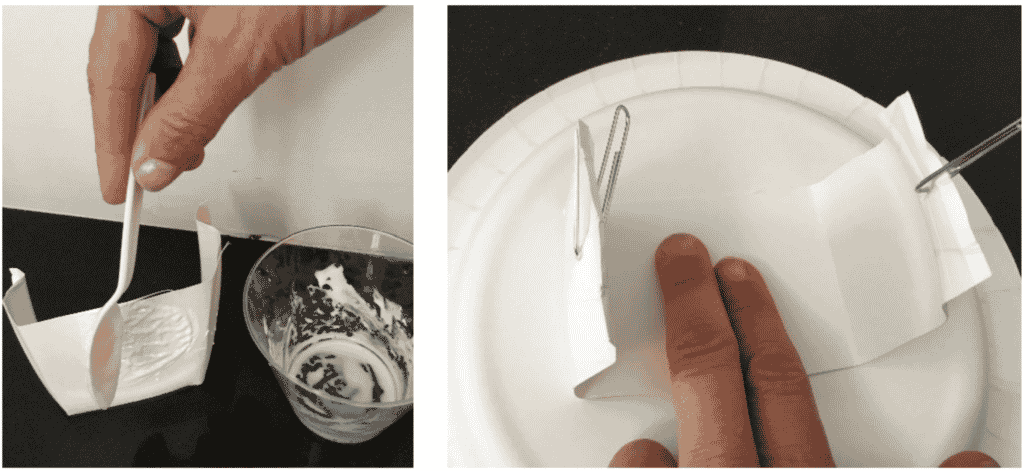
Spread a 1/2 teaspoon of the homemade glue on the middle third of a test strip and press it onto the bottom of a paper plate.
Do this for each type of glue that you want to test. Put the same amount of glue on each strip. Once the strip is stuck to the paper plate, let the glue dry for 1–2 minutes. Depending on what glue you are testing, you may need to increase the drying time.
Measuring Tensile Strength
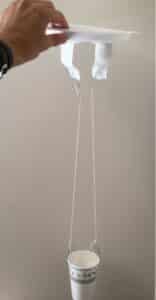
Attach the paper cup weight holder: place the top of the loop (the “handle”) of string through the paper clips on the ends of the test strip glued to the bottom of a paper plate.
Carefully add pennies as weights.
How many pennies can the cup hold before the glue gives way?
ACTIVITY VARIATIONS
 Conduct a peel test of the homemade and other types of glue. To conduct a peel test, cut two strips from the middle of two separate paper plates, each 2″ wide. Fold one of the strips in half. Apply the homemade glue on one half of the paper plate strip and adhere it to the other strip so it forms an L, with the unglued half sticking straight up from the flat strip. Smooth out the glued side with a rolling pin or by hand. Repeat the same test with other types of glue. Lift, or peel, each strip off to determine which is stronger (the one that is more difficult to peel off).
- Does the dryness of the glue make a difference? Repeat the tests, but allow the glue to dry overnight before adding weight.
- Compare tensile strength when the glue is used on different surfaces. Rather than a paper plate, use a ceramic tile or glossy paper.
- Build a structure, a bridge, or even a wall using pieces of cardboard or paper and homemade glue. Test the structure using a diecast car or other weighted object to see which team can build the strongest structure with their homemade glue. Then build and test the structure using the other sticky substances.
- Mix glue with sand and build a simple structure. Allow it to dry. How many pennies or other weights can it hold before crumbling?
TROUBLESHOOTING
The glue is too liquid: Squeeze out more of the liquid using a coffee filter. Add another pinch of baking soda.
The filter tears: Apply gentle pressure to push the liquid through the filter.
Guiding questions
GUIDANCE FOR YOUNGER CHILDREN
QUESTIONS TO ASK AFTER THE ACTIVITY
- Some glues are very sticky and some are not so sticky. Can you think of when you would use each type of glue?
- Some glues dry very quickly and some glues take a long time to dry. Can you think of when you would use each type of glue?
GUIDANCE FOR OLDER YOUTH AND ADULTS
QUESTIONS TO ASK AFTER THE ACTIVITY
- Some glues have better shear strength than tensile strength, while other glues have better tensile strength than shear strength. When would you use one versus the other?
Engineering & science connections
GUIDANCE FOR YOUNGER CHILDREN
Engineering Connections
What’s the best glue for the job? Engineers define this according to the needs of the project. You wouldn’t want to use the same glue used on a roll of masking tape to build a wall.
Have you ever used a Post-it Note? The glue on those was developed in 1968 by someone trying to create a super-strong adhesive. They wondered what could be done with such a weak, repositionable, pressure-sensitive glue. It was called a “solution without a problem.” Five years later, a colleague had the idea of applying the glue to little strips of paper and using them to mark his place in a hymnbook. That was the beginning of the Post-it Note as we know and use it today!
Science Connections
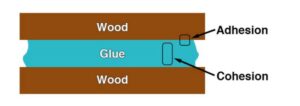
There are two main ideas for understanding how glue holds things together: adhesion and cohesion.
Adhesion is when one substance sticks to a different substance; for instance, when glue sticks to wood. Cohesion is when a substance sticks to itself; for instance, when molecules of glue stick to other molecules of glue.
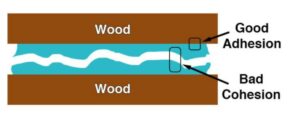 In order for a glue to do a good job of holding two pieces of wood together, it must have BOTH good adhesion and good cohesion.
When engineers create or use a new glue, they must take both adhesion and cohesion into account. Cohesion is a property of the glue itself. Adhesion is a property of both the glue and the material it is trying to stick to. That’s why some glues work well on wood and other glues work well on plastic.
GUIDANCE FOR OLDER YOUTH AND ADULTS
Engineering Connections
Ancient engineers added a variety of materials to adhesives to try to make them stronger. This includes blood, urine, and eggs. Since rice is so important in China, it’s no surprise that it was used, as well.
Sticky rice contains a high concentration of a carbohydrate called amylopectin. When a cooked soup of sticky rice is mixed with limestone, the amylopectin prevents large crystals from forming in the mortar. This results in a mortar that is especially water resistant and that gets stronger over time as the chemical reactions continue to occur.
Science Connections
What makes one substance adhere to another?
There is no single theory that explains this. Some glues work in one way and other glues work in a different way. But most glues use several of these methods.
Mechanical: If you look at a surface under a microscope, you will see that even the smoothest surface has lots of bumps and pits. Some glues can get inside these little holes and grab on, almost like your fingers grabbing onto small holes in a rock wall you are trying to climb.
Electrostatic forces: If you zoom in even closer, you can see that all materials are made up of molecules which, in turn, are made up of protons, neutrons, and electrons. Protons, which have a positive electrical charge, and electrons, which have a negative charge, attract one another. When molecules get very close to each other, these electrical charges can pull the molecules together.
Chemical bonds: Sometimes when the chemicals in one substance touch the chemicals in another substance, an actual chemical reaction can occur. In other words, a new material forms at the boundary where the substances touch.
Diffusion: This occurs when the molecules of one substance actually get tangled up with the molecules of the other substance.
Created by Marcy Klein and Eddie Goldstein, Alchemy Studio, for the American Society of Civil Engineers. All rights reserved.
Supplemental content adapted for Dream Big Activities by Carnegie Science Center.
Funding for this Dream Big Activity was provided by a generous grant from the United Engineering Foundation.
0 Comments