
Build an Earthquake-Resistant Structure
Teams use marshmallows and toothpicks to engineer a structure that can resist the simulated shaking of an earthquake. They gain experience with strong building design and the types of energy released by an earthquake.

Overview
STEM careers
Time
Materials
Per Earthquake Simulator:
|
Consumables per Team:
|
Relevant Terminology
Epicenter: The spot on the Earth’s surface that is directly over the place where an earthquake begins.
Seismic waves: Energy released in the form of waves after tectonic plates have shifted.
Tectonic plates: The plates that make up the outermost layer of the Earth’s crust, also called the lithosphere.
Truss: A structure made out of triangle shapes and designed to carry heavy loads.
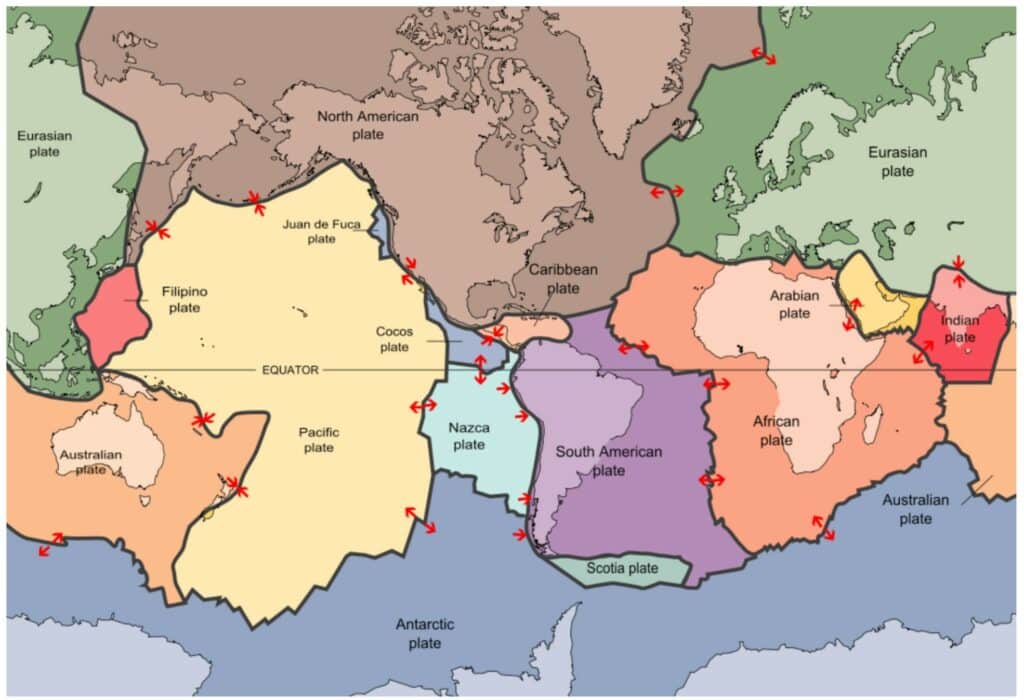
A map of Earth’s tectonic plates. Earthquakes are most common at the boundaries between plates. The movement of plates relative to one another is shown with red arrows. Credit: United States Geological Survey.
Introduce
GETTING READY
Build an earthquake simulator to test the structures. You may choose to have several earthquake simulators made in advance, or you can let participants build their own—or, if you are doing this in a museum, they may already have a shake table in their exhibit gallery. To build your own simulator, complete the following:
- Place a handful of marbles in the shoebox. They should be able to roll around freely.
- Trim the lid of the box to create a platform that rests on the marbles. Leave about an inch of space between the platform and each edge of the box.
- Poke a hole in one corner of the platform. Place one end of a rubber band through the hole to make a loop, then feed the other end of the rubber band through the loop to form a knot. Repeat with the other corners of the platform. Place the platform on the marbles.
- Poke a hole near a corner of the box, level with the platform. Pull the rubber band from the platform through the hole and tie it off or secure it to the side of the box with tape. Repeat for the remaining corners.
- Test the simulator by pulling on one end of the platform and releasing it. It should shake back and forth. You may need to adjust the tension of the rubber bands to achieve the best results.
INTRODUCTION
In ancient times, people had many stories and myths that tried to explain earthquakes. Today, we know that Earth’s surface is made of many plates that move very slowly—only an inch or two each year. These enormous slabs of rock, called tectonic plates, can interact in three ways: they can spread apart, collide, or slide against each other. Earthquakes can happen anywhere on Earth, but they are most likely to occur where two tectonic plates meet.
Engineers work hard to design and build earthquake-resistant buildings. There’s no such thing as an earthquake-proof building, but engineers can figure out ways to reduce the damage and to keep people safe.
Designing earthquake-resistant buildings is extremely important in areas where earthquakes are common, like California and Japan. One way to make a building stronger is to use trusses and cross bracing, which make a structure stronger by using triangle shapes. Base isolation is another building technique that uses springs or bearings to allow the foundation to move under the building. Incorporating giant shock absorbers into a building’s construction and using flexible materials, like structural steel, are also techniques used to resist earthquakes. Today you will get to engineer your own structure to resist a quake.
Instructions
Ask participants what they know about earthquakes. Have they ever been in one or seen what kinds of damage they can cause? Can they think of any ways that buildings could be constructed to withstand an earthquake?
Introduce the design challenge. Participants will work in small teams to build a structure that can withstand an earthquake. They may use up to 30 toothpicks and 30 miniature marshmallows.
Provide instructions to the participants:
- Plan your structure. Should it be flexible or rigid?
- Sketch a diagram of your structure’s design before beginning construction. Planning through drawing is an important part of the engineering design process.
- Build your structure.
- Connect the toothpicks and marshmallows to build your design.
- You do not need to use all of the marshmallows, but you cannot use any more than 30.
- Test the structures.
- Place the structure on the testing platform.
- Start with a gentle earthquake. Use your finger to gently shake the platform. Observe how the structure moves.
- Gradually increase the strength. How hard do you need to shake the building to cause it to fail?
- Note weak points in your structure and think about how you can improve them. Make modifications and test again.
Evaluate the success of each design.
- Did the structure stand on its own before testing? Did the structure withstand the first, weak earthquake?
- What’s the longest amount of time the structure stood upright while the earthquakes shook it?
ACTIVITY VARIATIONS
Introduce a minimum height requirement, or require the building to hold a certain amount of weight.
Provide an array of building materials. Encourage participants to test the same design using different materials.
TROUBLESHOOTING
If the buildings seem weak, lead participants to the idea of using a truss design.
If using the cardboard box earthquake simulator, make sure the rubber bands are taut. Overly loose or tight bands will affect the simulator’s performance.
Guiding questions
GUIDANCE FOR YOUNGER CHILDREN
QUESTIONS TO ASK AFTER THE ACTIVITY
- Was your structure successful at resisting an earthquake? Why or why not?
- Did your final structure look like the one that you originally designed on paper? If not, how was it different? How do you think that engineers change their minds between original design and final product?
- What did your structure look like? Were there any specific shapes that you included in your design?
- Did you make any changes to your design after testing? How?
- Which designs worked the best? The worst?
GUIDANCE FOR OLDER YOUTH AND ADULTS
QUESTIONS TO ASK AFTER THE ACTIVITY
- What existing structure(s) inspired your structure’s design? How do you think that engineers use existing structures for inspiration?
- What shapes were present in your design? How did this affect the building’s performance?
- How did you build your structural supports? What did they look like?
- Was your structure the same width throughout? Why or why not?
- How does what you did in this activity compare to the work of an engineer?
Engineering & science connections
GUIDANCE FOR YOUNGER CHILDREN
Engineering Connections
In October 1989, a large earthquake hit San Francisco and was broadcast live on TV because it struck during Game 3 of the World Series that was being played there. This terrible quake destroyed thousands of structures and caused part of the upper deck of the San Francisco Bay Bridge to collapse. Although this magnitude of earthquake is rare, the Earth’s crust is actually always moving and earthquakes happen constantly. Most are weak and don’t cause damage. But some are extreme, like the 1989 earthquake. As a result, engineers must design buildings and structures that can stand up to the stress of a strong earthquake.
When designing earthquake-resistant buildings, engineers must have a way of testing their structures. To do this, they use a device called a shake table to model the shaking that occurs on the Earth’s surface when tectonic plates shift. Shake tables move in many directions to demonstrate what happens when tectonic plates spread apart, collide, or slide past one another. Engineers use a shake table to find the weak parts of a structure, which might collapse in an earthquake. The shake table shakes a model of the structure until it fails and collapses. Engineers can then identify and correct weaknesses in their design before constructing the actual building.
Science Connections
Earthquakes occur when the rocks that make up the Earth’s crust slip and slide past or against one another. This normally happens at locations deep inside the Earth called fault lines, where there are breaks in the Earth’s crust. When these rocks slide past one another, they release a great deal of energy. This energy release causes the ground to shake up and down and left to right.
The Earth’s crust is divided into seven major and many smaller pieces called tectonic plates. All of these plates are floating on top of the liquid interior of the Earth. The plates move and, depending on which way they move, form different types of boundaries. One type of boundary occurs where plates separate and move away from each other, such as underwater in the middle of the Atlantic Ocean. As a result, this ocean is slowly getting larger. A second type of boundary occurs where plates crash into each other, such as where India is crashing into the continent of Asia. The collision of these two plates has resulted in the formation of the Himalaya Mountains, which include Mount Everest, the tallest mountain in the world.
GUIDANCE FOR OLDER YOUTH AND ADULTS
Engineering Connections
Engineers design all of their buildings to withstand the force of gravity, which acts to pull the building toward the center of the Earth. However, in certain areas, like California, Japan, and other countries around the Pacific Ocean, engineers must also design structures to endure seismic waves caused by earthquakes, which can damage a building. For a building to stand up to these types of stresses, engineers often include components called trusses in their designs to add strength and to distribute the forces of stress over a larger area.
A truss uses triangular shapes to add stability to a building. The triangles work to absorb the up-and-down and side-to-side forces that result from an earthquake. In the structure that you designed and built, you could try adding toothpicks or arranging these components to produce trusses and cross bracing. Like all good engineers, by adding, subtracting, revising, and always improving your design, you would ultimately build a structure likely to be stable in the face of an earthquake.
Science Connections
When an earthquake strikes, waves that shake the Earth’s crust carry a massive amount of energy out from the epicenter (the earthquake’s origin point). These seismic waves come in two types: body waves and surface waves. Body waves are the first waves released and travel in straight lines through the Earth’s interior. There are two types of body waves: P-waves and S-waves. P-waves move in the same way that sound waves move, compressing and expanding the Earth as they move horizontally through it. S-waves move up and down, similar to the waves that you see in the ocean. While P-waves can travel through solids and liquids, S-waves can only travel through solids.
After the release of the body waves, the earthquake releases surface waves. There are also two types of surface waves: Love and Rayleigh waves. Both of these types of waves result in horizontal shaking of the ground, like P-waves. However, Rayleigh waves also shake the ground vertically, like S-waves. The combination of the vertical and horizontal motions of these waves places extreme amounts of stress on buildings and can result in structural failure and collapse.
The source of this material is the TeachEngineering digital library collection at www.TeachEngineering.org.
All rights reserved.
www.teachengineering.org/activities/view/cub_natdis_lesson03_activity1
Supplemental content adapted for Dream Big
Activities by the Carnegie Science Center.
0 Comments