
Design a Wind Turbine
Students design and test different sizes and shapes of wind blades to determine which kind can maximize the electrical output with the breeze from a fan.

Overview
STEM careers
Topic
Time
Materials
For a Team of 2-3 Students:
|
For the Whole Class:
|
Instructions
- Safety note: Be sure that students wear safety goggles at all times and use care when handling the scissors, wire, and motors.
- Explain to students that they will be designing turbine blades for a windmill that will generate as much electricity as possible. The faster the turbine spins, the more electricity will be produced.
- The first step is to make the wind turbines. You may instruct students to do this, or prep these turbines in advance to save time.
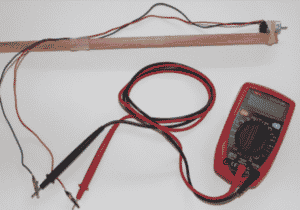
- Attach the DC motor to the end of a ruler or dowel with tape or a rubber band.
- Cut 2 pieces of insulated wire about 40 cm long each.
- Strip 2 cm of the insulation off each end. Pinch the insulation with the scissors slightly cutting it, then pull off the insulation.
- Attach the end of one wire to one outlet on the motor and the other wire to the other outlet on the motor. Tape the wires to the ruler or dowel at about the halfway point. If desired, add a small alligator clip to the end of each wire for ease of connection to the voltmeter.
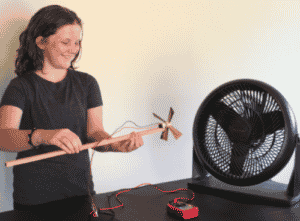
- Next have the students design and build their wind blade assemblies using a cork as the foundation. Explain that there are many possible solutions and they will be designing their own from scratch using the materials available. Ask them to think about how fan blades work, and to consider the size, shape, materials, and angle of their wind blades. Have each group discuss and design their assembly before building. Once the designs are complete, have students mount the blade assembly onto the motor by pushing the cork snugly onto the shaft, aiming for the middle as best as possible.
- Now the windmills are ready to test one at a time. Attach one wire to one outlet of the voltmeter and the other wire to the other outlet of the voltmeter. Turn the fan on low speed, and use the ruler to hold the turbine in front of the fan. Adjust the distance to generate as much voltage as possible. Record the results. Repeat using the high speed on the fan.
- Based on what they observed, and as time allows, have each team modify the design of their wind blade assembly to improve its performance. Retest and record the new results.
- Lead a discussion to compare results from the different designs and why certain designs perform better.
Guiding questions
-
What blade material might be even more sensitive to wind than paper?
-
What are some alternative ways of connecting the blades to the stem? How might they affect the sensitivity of the pinwheel?
-
In nature, how are different blade shapes and materials used to take advantage of wind?
Engineering & science connections
- Using wind as energy is not a new concept. Colonists used windmills as an energy source to pump water, grind wheat and corn, and power the blades at sawmills. Through the years, power lines replaced windmills, but the oil shortage of the 1970s created an interest in alternative energy sources and the windmill was reborn.
- Wind power can bring electrical power to remote areas that are inaccessible to conventional sources.
- Wind can be intermittent at times, so backup sources of power are needed from traditional sources or alternative sources.
Based on the classroom activity “Witnessing Wind” provided generously by Shell Energy North America.
0 Comments