
Build a Water Timer
Activity Challenge: Students will design and build a timer that works by measuring how much water drips out of or into a container.

Overview
STEM careers
Time
Materials
Per Person or Team
- Bendy straws
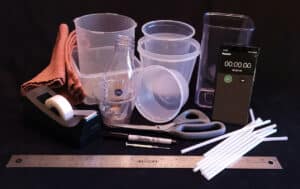
- Tape
- Scissors
- Sharpie or permanent marker
- Ruler
- Stopwatch or clock with second hand
- Clear plastic and/or waterproof containers of assorted sizes and shapes
- Water
- Something that can poke small holes in plastic cups and containers
- Towels to mop up any spilled water
Introduction
The ancient Egyptians were great at telling time—even though they had no clocks or watches. They used sundials, which were helpful so long as it was sunny. They also used water clocks that worked regardless of the weather or time of day. There were two varieties: The inflow type measured water in a bottom container as it gradually filled from water dripping into it. The outflow type measured the water as it left the top container and dripped into the bottom one.
In this activity students will also use two containers to devise their own water timers.
Success Criteria
- The timer has to measure a specific length of time, as close to 3 minutes as possible
- The timer has to measure the same amount of time twice in a row, within 5 seconds accuracy
- The timer works via the movement of water from one container to another
Constraints
- Use only the materials provided (but no need to use them all)
- The timer has to be replicable
- The water has to stay inside the containers
Instructions
Share the challenge with students: Design and build a timer that works either by measuring the amount of water flowing out of one container or the amount flowing into another.
Define the Problem
- Go over the success criteria and the constraints with students. Demonstrate how a self-starting siphon works using three bendy straws. (We recommend you set it up and practice in advance.)
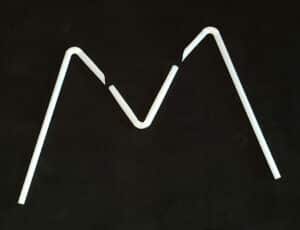
The straws ready for assembly.
Connect the bendy straws into an M shape, with the first hump slightly lower than the second hump. It’s important that the straw connections are airtight—you may cut the straw ends into points for ease of insertion and place tape around the connection points. Show the students the bendy straws and the container; insert the front end of the straw into the container and rest the taller (second) hump on the lip of the container. The end of the straw should be placed into another container for water to flow into. (See the photos for setup guidance.)
-
Ask students how much water they think needs to be in the top cup before water starts flowing out of the straw. Slowly pour some water into the cup but be sure to stay below the lower hump in the straws; water will not flow out. Then add more water to fill the cup above the top of the lower hump. All the water will flow out of the cup through the straw.
- Next, introduce students to the concept of flow rate. Prepare the following: a tall container with a small hole poked at the bottom that is plugged with a piece of tape, a container below it to catch water, and some water. Fill the plugged container about 1/3 full and unplug it. Ask students to notice the flow. Once all the water is out of the container, ask: “If I put more water into the container than I did before, will the flow intensity be the same or different?” After taking some suggestions, plug the hole again and fill the container to the top. When you unplug it, the flow will be noticeably stronger and faster until the level gets down to 1/3 full (because the height of the liquid affects pressure). Explain that they are observing the flow rate, which measures how many drops of water flow from the upper container into the lower one for 1 minute. A steady flow rate makes the timer more accurate.
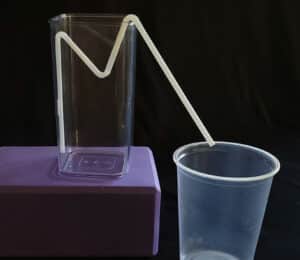
The self-starting siphon setup.
- Give students one more tip before delving into the activity. As they set up their water timer, they’ll need gravity to drive the flow of water, which means one container will have to be higher
than the other. They may need props to create different levels to set containers on such as
desks, tables, footstools, boxes, and/or stacked books. - Show students the materials. Get students thinking with some preliminary questions:
- Which will be easier to measure, water flowing out of a container or flowing into one?
- How will the shape of the containers affect the timer? Which shape is best for the container that the water flows into, flat-bottomed or sloped?
- How can flow rate be factored into the design of the water timer? Observe the way the flow rate changes as you experiment with varying amounts of water.
Brainstorm Solutions
- Distribute the materials. Give students time to explore variables such as different amounts of
water, container heights, siphon lengths, and container sizes and shapes. Encourage them to
test ideas and how much water to use before they finalize their design.
Build and Test

A simple water timer.
- Tell students to build their water timers. Assure them that after they test their first designs, they can change and improve their timers.
- The timer tester is someone outside the design group. This person has the stopwatch. When the designated group person says “1, 2, 3, GO,” the tester starts the stopwatch. When the stopwatch hits exactly 3 minutes, the tester says “STOP.” If the timer empties before 3 minutes, then the group person calls “STOP,” and the tester sees how much time is left. If the timer is still emptying after 3 minutes, the tester can continue timing so that the group knows how much adjustment their timer needs. Repeat testing and have the group take notes on the accuracy of the timer. The objective is to get it to within 5 seconds of accuracy.
Evaluate and Redesign
- Once everyone has had a chance to test their design, hold a discussion. What were the characteristics of the water timers that kept time with the most accuracy? If some groups used a siphon and some didn’t, what were the differences in accuracy?
- For teams whose timers were off by more than 5 seconds, encourage them to try again. For teams whose timers were within 5 seconds of 3 minutes, ask them to try making a timer that works for 5 minutes.
Guiding questions
- Where will you mark your water timer so you can see how much time has passed as the water
empties from the top container? - If the time it takes to empty the top container varies, what do you think is causing this variation?
- What is the weak point of your water timer? What happens if you change the angle of the top container?
Engineering & science connections
- When you float on the surface of water, it does not feel heavy. But the deeper you dive into the water, the more pressure it exerts on your ears (as well as the rest of your body). This heaviness is called hydrostatic pressure and is a result of the weight of the water caused by gravity. In a water timer, as the water leaves the upper container, the hydrostatic pressure lessens, which in turn lessens how fast the water flows out. It’s easier to make an accurate water timer if the water level in the upper container stays constant.
- Siphons have been in use for thousands of years, but scientists are still arguing about how they work! A siphon is a tube in a container that goes up over a hump, such as the edge of the container, to empty all of the liquid in that container into one at a lower level. One theory is that the pressure decreases at the highest point of the tube, which makes the pressure on the surface of the liquid push liquid up into the tube toward this area of lower pressure, right where it’s looped over the edge of the container. Another theory is that gravity pulls the liquid through the tube once it’s sucked up into the tube and over the hump. It may be that gravity, pressure, and the cohesion of the molecules in the liquid all cause siphons to work.
- Water flow rate is the amount of water coming out of a pipe or fixture within a certain period of time, usually measured as gallons per minute (GPM), whereas water pressure is related to the amount of force pushing the water through that pipe or fixture. Water pressure is often created by using height differential—with gravity as the exerting force—but it may also be created by a mechanical pump. Water pressure is measured in pounds per square inch (psi). Indoor plumbing depends on adequate water flow rate and pressure. So do fire hydrants, gas station pumps, hydroelectric dams, and other systems—all designed by engineers.
0 Comments